
Greetings programs! Today we’re going to spin up IOS Certificate authority.
IOS CA is a valid workaround for the Self Signed Certificate Issue documented in Cisco Field Notice 70489: PKI Self-Signed Certificate Expiration in Cisco IOS and Cisco IOS XE Software. This article should give you enough information to spin up a CA that’s reasonably safe and easy to operate.

Introduction
In PKIFNE part 10 (link), I introduced Cisco IOS Certification Authority, reviewing its use cases, deployment options, and enrollment challenges. In this installment we’re going to dip our toes in the water and put together a basic working configuration utilizing Simple Certificate Enrollment Protocol (SCEP). This design is suitable for production deployment in a small to medium sized network.
Notes:
There are some interactive steps in turning up a CA and enrolling spokes. Also there is a one line configuration difference between a spoke and a hub. for these reasons, the configurations are broken up into several snippets. After the snippets I’ll show you what the output should approximately look like, and we’ll follow that up with some verification commands for testing and troubleshooting your deployment.
For more detailed information on IOS CA, here is a link: IOS-XE public key infrastructure configuration guide.
Topology
In this example, we’re going to do a spoke and hub network, with a CA sitting behind the hub. For simplicity’s sake, I’ll forgo some of the things I would normally include in this kind of design (such as DMVPN with FVRF) so we can focus on the PKI part. Just know that this design is intended to work with a spoke and hub vpn topology.

Quick verification that our toplogy is functional and we have the routes:

Root CA
Overview
In this simple design we have a single root issuing CA. Let’s go ahead and pop in a somewhat minimal working config. We’re going to:
- Generate a 2048 bit RSA keypair called CA
- create a folder to hold our pki database
- Create a CA server called CA
- set the database level to name
- set lifetimes on our CA and client certificates (feel free to alter as needed)
- set the issuing CA information
- Automatically grant certificates
- enable the ios HTTP server
- Disable all HTTP modules except for the SCEP server
- Put an access control list on the HTTP server
CA configuration snippet 1
!------Basic IOS CA-----------!
Crypto key generate rsa modulus 2048 label CA
!
!**** leave blank line after pki*****
do mkdir pki
pki

!
!
ip http server
!
!*****Whitelist for SCEP clients*****
access-list 99 permit 10.1.1.1
access-list 99 permit 10.1.1.2
access-list 99 permit 10.1.1.3
access-list 99 permit 10.1.1.4
access-list 99 permit 10.1.1.5
!
ip http access-class 99
!
crypto pki server CA
Database url flash:/pki/
Database level names
Lifetime ca-certificate 7000
Lifetime certificate 3500
issuer-name cn=r1.densemode.com,O=Densemode,OU=IT
!
!***Grant auto should be combined with http acl to restrict access***
grant auto
!
!*****you will need to interactively enter a passphrase****
!*****After no shut command is issued*****
no shut
This approximately what you should expect to see when turning up the CA:

CA configuration Snippet 2
!——————Disable unused http session modules—————!
ip http secure-active-session-modules none
ip http session-module-list RA SCEP
ip http active-session-modules RA
Client configuration
Overview
The basic workflow is pretty straightforward.
- Configure a trust point
- Authenticate the CA
- Enroll the device with the CA
These are the features we’re going to configure on the client:
- generate a 2048 bit RSA keypair
- define a trustpoint to hold our configuration
- set the enrollment url to the loopback of the CA
- set our source interface to our loopback
- set our subject-name field
- set our FQDN field
- attach our RSA keypair
- pull down the CA certificate
- enroll the device
- optionally disable revocation checking (explained later)
Client configuration snippet 1
!----—router enrollment config-----------!
!*****This goes on the client routers in your topology*******!
!*****Be sure to change the subject-name and fqdn fields*****!
!*****To match your devices*******
!*****Ansible+jinja2 templates would be a great way******
!*****To template this configuration**********
!
Crypto key generate rsa modulus 2048 label CA
!
crypto pki trustpoint CA
Enrollment url http://10.1.1.1
source interface lo0
subject-name cn=r2.densemode.com,O=Densemode,OU=IT
Fqdn r2.densemode.com
Rsakeypair CA
!
!******Accept the CA certificate*****
Crypto pki authenticate CA
you’ll get a prompt asking you to verify you trust the fingerprint of the CA certificate:

Client configuration snippet 2
!******Follow the onscreen prompts****
Crypto pki enroll CA
There will be a short series of prompts prior to the enrollment request being sent to the CA. If everything is in order you get a success notification a few seconds after the request is sent out.

Client configuration snippet 3
!***** Use this on remote spokes to solve CA chicken and egg *****
!***** Reachability problem *****
!***** It's not a security risk because the hub router *****
!***** Will perform the validity checks *******
!
crypto pki trustpoint CA
revocation-check none
Verification of CA
Verification commands:
- show crypto pki server
- show crypto pki certificates verbose
- show ip http server session-module
- show ip http server status
- show access-list

Using the ‘show pki server‘ command We can see here that our CA is up and running, along with operational and configuration information.

The ‘show crypto pki certificates verbose‘ command allows us to inspect the CA server certificate. Notice the certificate usage is signature. This certificate will be used to digitally sign all certificates issued by the CA

‘show ip http server session-module‘ can be used to verify we’re only running the minimum services needed for the CA to act as a SCEP server to issue certificates in-band over the network

This truncated output ‘show ip http server status’ Allows us to verify the access list devices that are allowed to communicate with the SCEP server. In this case it’s access list 99.

As we can see here, our access list allows only the loopback interfaces of our routers to request certificates from the CA. For a production network this is vital if you’re going to configure the CA to automatically grant certificates.
Exploring the contents of the CA database
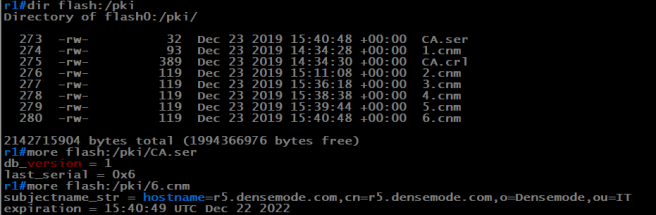
In our sample configuration, we placed the CA database under a folder called PKI. As you can see from the output, there is a:
- Serial number file
- Certificate Revocation List (CRL)
- A file for each certificate issued with the serial # as the filename.
Since we did a database level of name, the serial number file contains the hostname and expiration date of the issued certificate. If you needed to revoke a certificate for a device, this is how you would verify you’re revoking the correct certificate. It’s also why we set the database level to name. 🙂
Client Verification
- show crypto pki trustpoint status
- show crypto pki certificates verbose
- show run | section crypto pki trustpoint

The command ‘show crypto pki trustpoint status’ allows to verify that the Trustpoint is properly configured and we have a certificate issued from the CA. We can also inspect the fingerprint of the CA certificate and the router certificate.

‘Show crypto pki certificates verbose’ allows us to inspect our router certificate in detail. This is an easy way to check the validity period of your certificate and verify that you used a suitably strong keypair in your certificate request.

‘show run | s crypto pki trustpoint‘ Enables us to check a couple of important details the other commands can’t give us. The important ones among these are:
- source interface
- revocation-check
Source Interface
Because we’re setting an Access Control List (ACL) on the web server of our issuing CA, it’s important to source the packets from the IP Address that’s in that access list. If we don’t explicitly set the interface, the router will use the routing table to decide which ip address to use.
Revocation Check
In many common designs, the router will not have reachability to the CA until its vpn tunnels come up. However if certificate authentication is being used to form the tunnel, by default the router will attempt to use SCEP to request the Certificate Revocation list (CRL), and the revocation check will fail. We have a chicken and egg problem
Certificate Auth VPN and revocation checks
The solution is straightforward. Since all spokes must transit the hub router to reach the CA, we can have the hub router perform revocation checks and disable it on the spokes. In this way, you can revoke a certificate for a spoke and will be effective as the hub will no longer accept connections from it, preventing the revoked device from coming up on the network.
When we’re inspecting a spoke, we want to see ‘revocation-check none’ in the configuration output.
Revoking a certificate
One of the useful features of IOS CA and PKI in general is we can revoke a certificate at will. For VPN applications this is much better than pre shared keys. In the following exmample, let’s imagine that R5 is being decommissioned.

using ‘show crypto pki cerfificate’ on router 5, we can see that the serial number of the certificate is 7. Let’s verify this on the CA.

using the more command, we can view the contents of certificate serial #7 in the CA database.
Let’s go ahead and revoke the certificate

we revoked the certificate using cry pki server <ca name> revoke <serial #>. This will cause the crl file to be updated so enrolled devices with revocation checking will stop accepting the certificate.
Wrap up
There you have it, a basic utilitarian IOS CA configuration. There are a lot of details left out such as auto-renewal, whether or not to make the private key of the CA exportable for DR purposes, etc. But this is a good 80% solution in my opinion.
Hope you found this useful and I’ll see you around.
-s
