Hello!
Here’s a cheatsheet I made to help me remember the basics of ZBFW. It doesn’t get into the advanced details, but it’s enough to ge typical config up and running.
Cheers,

-s

Hello!
Here’s a cheatsheet I made to help me remember the basics of ZBFW. It doesn’t get into the advanced details, but it’s enough to ge typical config up and running.
Cheers,
-s
Greetings programs!
Today we’re talking about zone based firewall.
Zone based firewall is a stateful firewall available as a feature on cisco routers running ios and ios-xe. It’s capable of using nbar to identify traffic and and can perform deep packet inspection (DPI) on a few protocols (the most notable being http). Interestingly it can use Trustsec Security Group Tags (SGTs) as a matching condition.
It offers a cost effective solution for a couple of common cases. One would be small branch offices utilizing an internet connection for Guest internet and a backup dmvpn tunnel.
ZBFW provides a strong alternative to the care and feeding of a separate firewall in some situations, especially now that IOS-XE is capable of running some pretty cool containerized security apps like Snort and Stealthwatch learning network.
There are a couple of tradeoffs to using ZBFW that I noted when I was playing with it. The biggest one is classes in the service policy cannot be reordered or inserted inline. you have to delete and re-create the policy, then add it back in to the zone pair. That could lead to some change management headaches.
With that out of the way, let’s go ahead and take a look at this thing.
The term stateful in the context of a firewall means the firewall builds and maintains a connection table based on traffic it receives on it’s interfaces. It uses this information to automatically allow the return traffic when it sees the match in the connection table.
A row in a generic connection would look something like this:
[TCP:established|10.1.1.1:5200|8.8.8.8:80]
This would be a http connection from 10.1.1.1 to 8.8.8.8. when the return packet from comes back the firewall sees the match in the connection table and automatically allows the traffic. This neat little trick is what makes a firewall a firewall in the sense that most people understand it.
for starters have a quick look at this cheat-sheet that shows a simple use case involving internet access for some corporate computers and guest endpoints.
The way it works at a high level is classes are use to match traffic. A policy calls the classes and sets the action for the matching traffic . Finally the policy is attached to a zone-pair. A zone pair defines the source and destination interfaces that the policy will be applied to.
Zones define interfaces that share a common security policy. Traffic can move freely between interfaces in same zone.
It’s important to know, Interfaces that belong to security zones cannot communicate with interfaces that do not belong to security zones. This is something to keep in mind when designing the deployment and when troubleshooting.
There are two kinds of classes and policies. Layer 3/4 and layer 7.
Layer 3/4 class maps are traffic selectors. Classes are used to identify what traffic we want to apply an action to. Class maps can match based on protocol (NBAR), access-lists, another class map for compound conditions, security group tags (trustsec), and user groups.
A layer 7 class map is used for Deep packet inspection DPI. Most commonly used with HTTP to match attributes or content of http traffic. It’s outdated since most web traffic is encrypted now, but it’s there so I’m mentioning it.
Layer 3 Policy maps contain a list of classes, and the actions we want to perform on the classes.
There is a built-in class called class-default which matches anything not explicitly matched. It can be very useful for troubleshooting to call that class and add the log action to it to see what’s being blocked.
Layer 7 policy maps apply actions to the traffic identified by the layer 7 classes. These classes cannot be called directly from a service policy. they are called under a layer 3/4 class in a layer 3 policy map that identifies the traffic flows we want to perform DPI on.
Here’s a example
Class-map type inspect http CM-L7-HTTP-1
match response header length gt 5000
!
policy-map type inspect http PM-L7-HTTP-1
class CM-L7-HTTP-1
reset
!
Class-map type inspect CM1
match protocol http
!
policy-map type inspect PM1
class CM1
inspect
service-policy http PM-L7-HTTP-1
Note: Classes need to be called in most to least specific order. For example the there was a class matching on tcp then a class matching on http, the http rule would never fire. To re-order the classes, you must delete and re-create the policy, then re-add it back to the zone pair.
Nesting
There two types of nesting. nested classes and nested policy maps
Nested classes are used for creating compound matching conditions. i.e. example inspect these protocols for those hosts.
Nested policy maps are used in deep packet inspection. layer 7 policy maps are called under a class in a layer 3 policy map
Nested class example. this accomplishes the goal of allowing a specific list of protocols for a specific host. It’s a basic compound condition.
access-list 100 permit ip 10.1.1.1 any
!
class-map type inspect match any CM1-L4
match protocol http
match protocol dns
match protocol icmp
!
Class-map type inspect match-all CM1-L3
match access-group 101
match class CM1-L4
There are quite a few different kinds of parameter maps. I’m going to cover a couple of them briefly.
Layer 3/4 maps are used primarily for DDOS prevention. they are attached to the action in a policy map i.e. “inspect PARAM-MAP” where param-map is a parameter map.
The most common layer 7 parameter map is regex which is used to match strings in http traffic. It’s applied as an argument to a layer 7 class map.
There is a global inspect parameter map, and this where NBAR2 for protocol classification can be enabled, as well as general connection controls.
A zone pair defines what traffic is allowed to pass from a source zone to a destination zone. Being stateful, the zone pair builds a connection table based on outgoing traffic. return traffic that matches an entry in the connection table is allowed.
The self zone is a special built in zone that’s used to control traffic to and from the control plane of the router.
The self zone has some different behaviors and restrictions from normal zones, and it’s worth taking a closer look at it.
Zone pairs involving the self zone are not stateful. They behave a lot more like access control lists. There have been changes to how self works from version to version, so be mindful of that and test the your image before deploying self zone on a live network. For the version of IOS I tested 15.6(2)T, this is what I found:
By default traffic is allowed to and from the control plane to any zone unless the self zone is added to a zone pair, and a policy attached to it.
If a zone pair is created using self but no service policy is attached, traffic is still allowed.
If a service policy is attached, traffic in that direction is now restricted to what’s permitted in the policy, however, traffic in the other direction is not affected.
Because the self zone is not stateful, you must use the pass argument instead of inspect to allow the traffic, as the inspect directive has no meaning.
1. diagram out your zones and policies
a. determine if you need nested classes
i. i.e. match x protocols for y hosts
2. define zones
3. define parameter maps if called for (advanced)
4. create traffic selectors
access-lists
protocol matching
5. create policy maps
a. call class(es)
b. set action
6. create zone pairs and assign policies
7. assign interfaces to zones
8. test policies
9. review output to verify
1. good naming convention: type, direction.
a. ex: for layer 3/4 class map something like: CM-IN2OUT
b. ex: layer 7 CM-L7-BLOCKED-SITES
2. call class-default with drop log action to catch errors
3. pro tip: you can flip a class between match-any and match-all by just re-inputing the command. don’t have to remove re-add
1. show zone security – shows zone interface assignment
2. show zone pair security – verify overall configuration
3. show policy-map type inspect zone-pair – shows statistics for zone pair
4. show policy-map type inspect zone-pair sessions | s Established – shows connection table info.
5. show run | s class|policy|parameter|zone – basic dump of the config elements
This lab topology takes ZBFW and places it in the context of a typical branch office network doing Direct Internet Access (DIA). The zip contains the challenge and a solution. enjoy!


Greetings programs!
In this post, I’m going to go through my troubleshooting workflow for webauth redirect.
Webauth redirect is a core function of providing Network Access control with Identity Services Engine ISE. It’s used for a number of critical authentication flows, and when it does not work, you will not be able to provide guest access or onboard devices.
Taken as a whole the configuration and processes between ISE and the Network Access devices (NADs, which are Switches, and Wireless LAN Controllers) is quite complex, especially in the case of the switches. Trying to troubleshoot by staring at pages and pages of config, and making random google searches is going to be slow and painful. It’s much better to understand the information flow and dependencies, and using the device output to logically deduce where the problem lies.
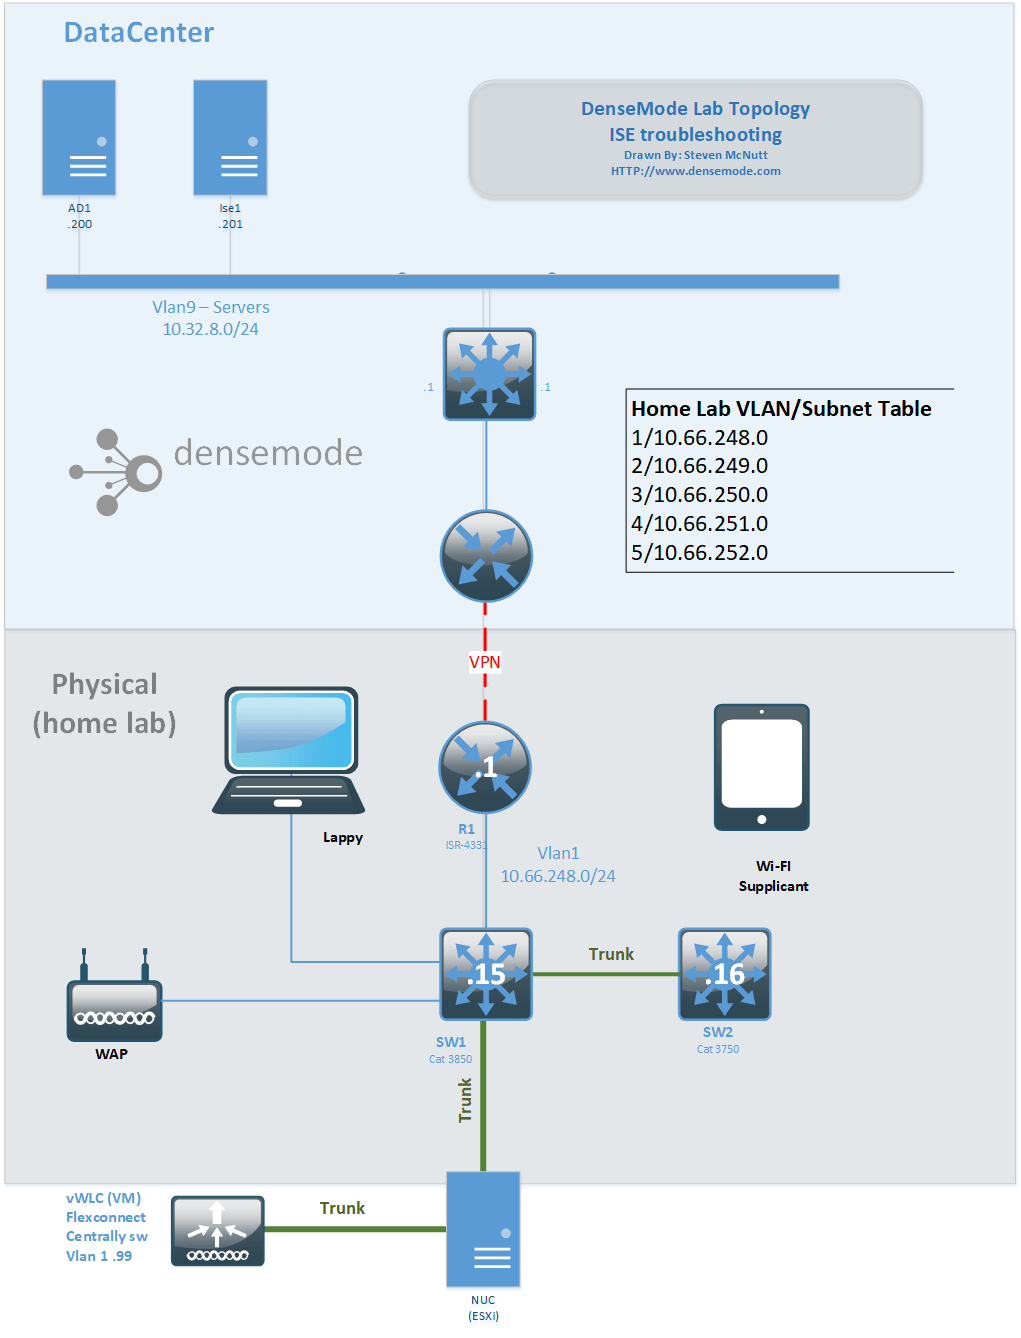
This is the toplogy we’re going to use for our example. It’s a cobbled together lab. ISE is running in a remote location, the vWLC is running in esxi on an intel NUC in my home lab.
Our ISE configuration is going to as simple as I can make it. This will be our policy:
There will be separate policy sets for wired and wireless for the sake of clarity.
To keep things simple, we’re going to allow self registration, which is not something you would normally do. After registering, the MAC address of the user’s device will be placed in the GuestEndpoints Group, which is the default for ISE.
At a high level a basic flow works like this:
To troubleshoot efficiently, it’s important to have a workflow that produces consistent results, then you need to trust it! It can be tempting to take shots in the dark hoping for the quick fix, but in the long run a process oriented approach will be consistently more productive and less stressful.
Now that we have our troubleshooting flow written down, let’s get started
on the WLC, the Redirect ACL uses opposite processing logic from the switches. Permit means “dot not redirect this traffic”. All other traffic will be redirected. This means we don’t have to bother with referencing an airespace ACL on the WLC as the implicit deny will prevent the remaining traffic from going anywhere.
Additionally, ACLs on the WLC have the following additional differences.
Typically a problem with the redirect ACL on the WLC. Steps to investigate:
Common causes:
Changing VLANs at the end of a guest flow requires the the user to download and run the NAC Agent to release and renew the IP address of the client. The NAC agent is Java based, and not supported in current web browsers. Vlan change for guest flows is not a good idea.

Enabling this setting will trigger a java applet download to run the NAC agent when the users completes log in. Probably not a good idea.
CoA is disabled by default in the Radius server configuration on the WLC, so it’s probably a common fault. Let’s use this one as an example of how to look at the device output to work out what’s going on.
First place to look is the Radius LiveLog. Looking at the sequence of events, we can see that the client hit the webauth rule, logged in, and then something went wrong.

We already know from glancing at this that first few steps worked and the user access the portal, but let’s take the opportunity to look at output on ISE and WLC for the webauth redirect step.
Checking the initial log entry on ISE (this is at the very bottom):

there’s the redirect with the with the session id. The user-name is the mac address of the wireless in the client.
Now let’s go to the WLC and take a look:

the redirect URL and redirect ACL have been applied to the client. The WLC has client in a Central Web Auth State.
Let’s take a quick look at the redirect ACL.

Redirect ACL allows DNS and traffic to and from ISE. all non http/s traffic will be dropped. HTTP/s traffic will be intercepted and the redirect mesages with the redirect URL will be send to the client.
So everything looks good until the end. Let’s take a look at that last log entry in ISE.

Change of Authorization Failure.
Ok, let’s go take a look at the configuration on the WLC.

Sure enough. Change of Authorization was disabled.
Ok, let’s enable CoA, delete the endpoint and guest account from ISE, and give it another try.

Let’s break down what’s going on here.

Ok that was cool right?
This screenshot depicts the set of Radius attributes that are sent down to the NAD. There are 4 items.

The Redirect ACL is the always the confusing part. Put simply, The redirect ACL tells the switch what traffic NOT to redirect and what traffic to intercept for redirection. This solves a chicken and egg problem. If http get requests to ISE were intercepted by the switch, what you would have is a redirect loop and you would never reach the portal.
Short answer: Permit means “redirect this traffic”. Deny means “leave this traffic alone”.
Keep in mind however only http/https traffic can actually be redirected. The Switch uses the built in web server to create the http redirect message that’s sent back to the client web browser.
In addition to the normal radius and dot1x stuff that’s required, WebAuth requires some additional items.
Ok, let’s apply our troubleshooting workflow to a wired problem.
Just like with wireless, we start by looking at log and device output to narrow the scope.
Let’s start with the radius log. It looks like we’re stopped at webauth redirect.
![]()
Let check the switch.


we can see we’re on switchport g1/0/1 and that the port is in the state we expect. so why isn’t it working? Let’s check the Redirect ACL.

Redirect ACL looks good. hmm. What are our other dependencies? Ah!

Http server is not running. ok let’s fix that and try again.
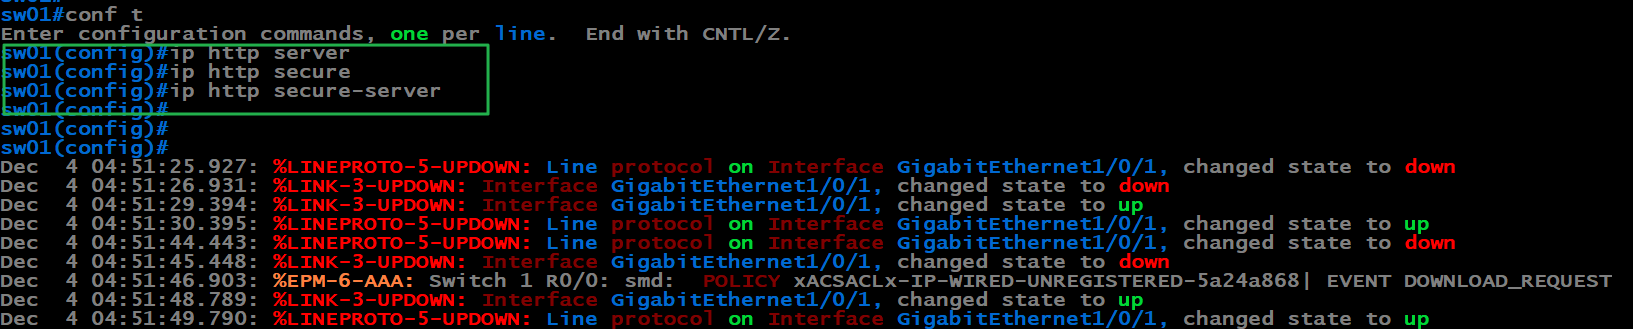


What? Why is the switch sending a reset instead of redirecting? we know the http server being shut off was an problem. It must mean there’s another fault with the switch. Let’s check for ip device tracking.

What?
What’s this, command doesn’t work? Better check the documentation.
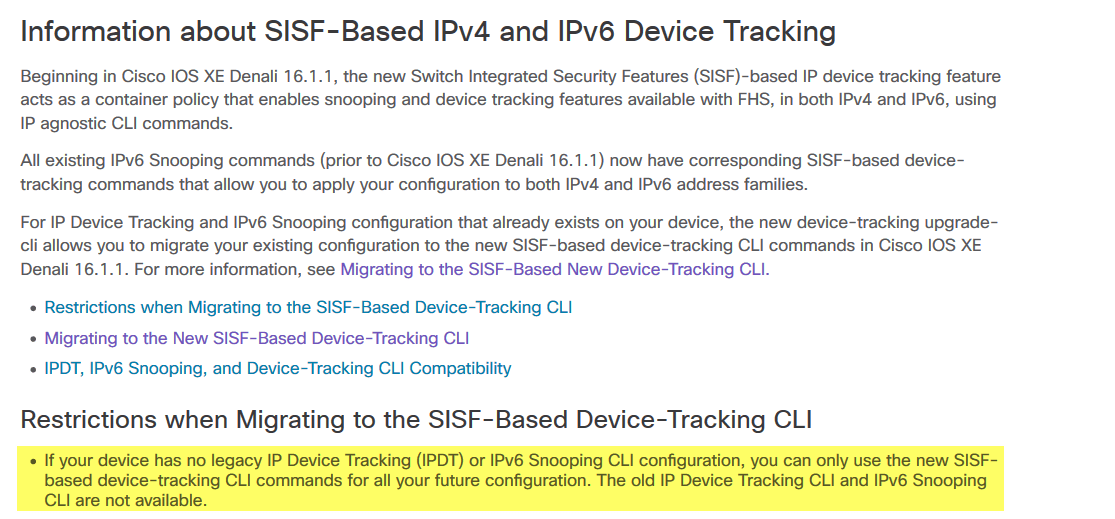
Ah, looks like our trusty dot1x template for ios-xe 15 isn’t working so well for ios 16, now we have to use some different commands to get ip device tracking to work. So let’s do that:
![]()
Working.


These are hard problems to solve because you have multiple faults and when the first thing you find doesn’t fix it, it’s easy to start doubting yourself. maybe it’s a problem with the endpoint etc. But by trusting the Radius logs, device output, and our knowledge of the process flow, we can deduce where the problem has to be, and you have to follow the output where it leads you.
I hope this was helpful. It’s helpful for me to write it down.
Until next time.
-s