Today we’re going to talk about managing skillsets over time to give oneself the best chance of long term career success and contentment.
Pi shaped skillset: Sun and lighthouse
Introduction
In a perfect world we would all be geniuses with photographic memories and could maintain the maximum attained level of skill for anything we trained for. Sadly this is not how it works for 99.99 percent of the population. It takes time and effort to develop skill, and when we stop doing that thing, skill deteriorates, memory fades.
What’s more, we now live in the age of digital transformation, a time of rapid change and upheaval. There is a good chance that the job you are doing today will not exist in 20 years.
When we combine the perishability of knowledge and skills with a rapidly evolving workplace, it’s self evident that it would be wise to implement some sort of strategy. I have come across several, which I will cover in the following paragraphs. Let’s start with the one everyone knows: T shaped Skillset.
T Shaped Skillset
T-shape skillset example
The T is the classic skillset mix that’s been promoted for a very long time. It’s based on the notion of developing deep expertise in one discipline, with a set of supporting skills around it. This was a very successful industrial age strategy and what a typical university education is designed to produce.
The fundamental problem with the T is it’s very risky in the current day and age. To use an old analogy, if you’re an expert in making buggy whips and people start buying cars, you’re going to have to reskill, and that takes time. You’re going to have a lot of downtime of not making much money while the reskilling is occurring. Been there, done that, not the best strategy for today.
The obvious solution is to have a plan B. Which brings us to the next strategy.
Pi Shaped Skillset
Pi shaped skillset
With a Pi shaped skillet, you cultivate a secondary skillset alongside the primary skillset you use in your day job. Second Skilling is a way to ramp up on emerging or disruptive technology without the income and career impact of reskilling. Additionally it also has the benefit of some cross-pollination, where deeply learned skills can be used across knowledge domains.
There is a third common strategy which typically seen with self employed and business owners/entrepreneurs, which we will cover next.
Skill Stacking
Skill stacking
Skill stackers take a number of skills and combine them to good effect. You don’t have to be particularly great at any of them, but you know how to combine them to produce results. Skill stackers tend to be independent consultants, business owners, inventors, and entrepreneurs.
Skill stacking leverages the concept of the Pareto Principle, which states that approximately 80% of results come from 20% of effort.
In his 2011 book Outliers, Malcolm Gladwell popularized the ten thousand hour rule, which roughly translates to the idea that it takes about 10,000 hours of practice to master something.
If we combine these two ideas of the Pareto Principle and the 10,000 hour rule, we come up with the idea that if we invest approximately 2000 hours of effort in learning and practicing something, we’re getting some real efficiency out of our time, which enables us to have a broader and deeper skillset than we might otherwise be capable of.
Broadening and Creativity
One thing I have observed, is that broadening your horizons and learning a little about a lot of things, particularly in the arts, can beneficial on a number of levels. For example, Nobel prize winning Scientists are 2.85 times more likely to engage in arts and crafts than their counterparts.
Closing thoughts
Anya really wants some fish. If only she had opposable digits and a fishing pole
We live in a world where to stay relevant professionally, we have to be agile; always preparing ourselves for the next opportunity. It’s exciting and frightening at the same time. Having a strategy to stay in position to take advantage of new opportunities is really important. I hope you enjoyed the read, and I’ll see you around.
In PKIFNE part 10 (link), I introduced Cisco IOS Certification Authority, reviewing its use cases, deployment options, and enrollment challenges. In this installment we’re going to dip our toes in the water and put together a basic working configuration utilizing Simple Certificate Enrollment Protocol (SCEP). This design is suitable for production deployment in a small to medium sized network.
Notes:
There are some interactive steps in turning up a CA and enrolling spokes. Also there is a one line configuration difference between a spoke and a hub. for these reasons, the configurations are broken up into several snippets. After the snippets I’ll show you what the output should approximately look like, and we’ll follow that up with some verification commands for testing and troubleshooting your deployment.
In this example, we’re going to do a spoke and hub network, with a CA sitting behind the hub. For simplicity’s sake, I’ll forgo some of the things I would normally include in this kind of design (such as DMVPN with FVRF) so we can focus on the PKI part. Just know that this design is intended to work with a spoke and hub vpn topology.
Demonstration Topology
Quick verification that our toplogy is functional and we have the routes:
Verification from r5
Root CA
Overview
In this simple design we have a single root issuing CA. Let’s go ahead and pop in a somewhat minimal working config. We’re going to:
Generate a 2048 bit RSA keypair called CA
create a folder to hold our pki database
Create a CA server called CA
set the database level to name
set lifetimes on our CA and client certificates (feel free to alter as needed)
set the issuing CA information
Automatically grant certificates
enable the ios HTTP server
Disable all HTTP modules except for the SCEP server
Put an access control list on the HTTP server
CA configuration snippet 1
!------Basic IOS CA-----------!
Crypto key generate rsa modulus 2048 label CA
!
!**** leave blank line after pki*****
do mkdir pki
pki

!
!
ip http server
!
!*****Whitelist for SCEP clients*****
access-list 99 permit 10.1.1.1
access-list 99 permit 10.1.1.2
access-list 99 permit 10.1.1.3
access-list 99 permit 10.1.1.4
access-list 99 permit 10.1.1.5
!
ip http access-class 99
!
crypto pki server CA
Database url flash:/pki/
Database level names
Lifetime ca-certificate 7000
Lifetime certificate 3500
issuer-name cn=r1.densemode.com,O=Densemode,OU=IT
!
!***Grant auto should be combined with http acl to restrict access***
grant auto
!
!*****you will need to interactively enter a passphrase****
!*****After no shut command is issued*****
no shut
This approximately what you should expect to see when turning up the CA:
CA configuration Snippet 2
!——————Disable unused http session modules—————!
ip http secure-active-session-modules none
ip http session-module-list RA SCEP
ip http active-session-modules RA
Client configuration
Overview
The basic workflow is pretty straightforward.
Configure a trust point
Authenticate the CA
Enroll the device with the CA
These are the features we’re going to configure on the client:
!----—router enrollment config-----------!
!*****This goes on the client routers in your topology*******!
!*****Be sure to change the subject-name and fqdn fields*****!
!*****To match your devices*******
!*****Ansible+jinja2 templates would be a great way******
!*****To template this configuration**********
!
Crypto key generate rsa modulus 2048 label CA
!
crypto pki trustpoint CA
Enrollment url http://10.1.1.1
source interface lo0
subject-name cn=r2.densemode.com,O=Densemode,OU=IT
Fqdn r2.densemode.com
Rsakeypair CA
!
!******Accept the CA certificate*****
Crypto pki authenticate CA
you’ll get a prompt asking you to verify you trust the fingerprint of the CA certificate:
Client configuration snippet 2
!******Follow the onscreen prompts****
Crypto pki enroll CA
There will be a short series of prompts prior to the enrollment request being sent to the CA. If everything is in order you get a success notification a few seconds after the request is sent out.
Client configuration snippet 3
!***** Use this on remote spokes to solve CA chicken and egg *****
!***** Reachability problem *****
!***** It's not a security risk because the hub router *****
!***** Will perform the validity checks *******
!
crypto pki trustpoint CA
revocation-check none
Verification of CA
Verification commands:
show crypto pki server
show crypto pki certificates verbose
show ip http server session-module
show ip http server status
show access-list
Our Certification Authority is up and running
Using the ‘show pki server‘ command We can see here that our CA is up and running, along with operational and configuration information.
CA Certificate
The ‘show crypto pki certificates verbose‘ command allows us to inspect the CA server certificate. Notice the certificate usage is signature. This certificate will be used to digitally sign all certificates issued by the CA
http server module status
‘show ip http server session-module‘ can be used to verify we’re only running the minimum services needed for the CA to act as a SCEP server to issue certificates in-band over the network
show ip http server status
This truncated output ‘show ip http server status’ Allows us to verify the access list devices that are allowed to communicate with the SCEP server. In this case it’s access list 99.
http access list example
As we can see here, our access list allows only the loopback interfaces of our routers to request certificates from the CA. For a production network this is vital if you’re going to configure the CA to automatically grant certificates.
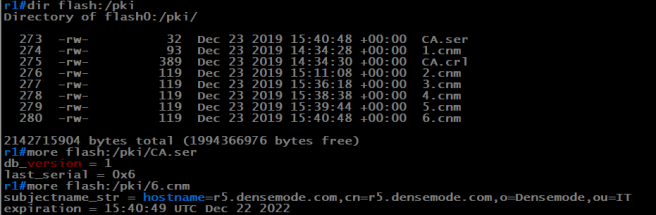
Exploring the contents of the CA database
contents of the pki database
In our sample configuration, we placed the CA database under a folder called PKI. As you can see from the output, there is a:
Serial number file
Certificate Revocation List (CRL)
A file for each certificate issued with the serial # as the filename.
Since we did a database level of name, the serial number file contains the hostname and expiration date of the issued certificate. If you needed to revoke a certificate for a device, this is how you would verify you’re revoking the correct certificate. It’s also why we set the database level to name. 🙂
Client Verification
show crypto pki trustpoint status
show crypto pki certificates verbose
show run | section crypto pki trustpoint
Verifying trustpoint status
The command ‘show crypto pki trustpoint status’ allows to verify that the Trustpoint is properly configured and we have a certificate issued from the CA. We can also inspect the fingerprint of the CA certificate and the router certificate.
Viewing a router certificate in verbose mode
‘Show crypto pki certificates verbose’ allows us to inspect our router certificate in detail. This is an easy way to check the validity period of your certificate and verify that you used a suitably strong keypair in your certificate request.
Trustpoint configuration
‘show run | s crypto pki trustpoint‘ Enables us to check a couple of important details the other commands can’t give us. The important ones among these are:
source interface
revocation-check
Source Interface
Because we’re setting an Access Control List (ACL) on the web server of our issuing CA, it’s important to source the packets from the IP Address that’s in that access list. If we don’t explicitly set the interface, the router will use the routing table to decide which ip address to use.
Revocation Check
In many common designs, the router will not have reachability to the CA until its vpn tunnels come up. However if certificate authentication is being used to form the tunnel, by default the router will attempt to use SCEP to request the Certificate Revocation list (CRL), and the revocation check will fail. We have a chicken and egg problem
Certificate Auth VPN and revocation checks
The solution is straightforward. Since all spokes must transit the hub router to reach the CA, we can have the hub router perform revocation checks and disable it on the spokes. In this way, you can revoke a certificate for a spoke and will be effective as the hub will no longer accept connections from it, preventing the revoked device from coming up on the network.
When we’re inspecting a spoke, we want to see ‘revocation-check none’ in the configuration output.
Revoking a certificate
One of the useful features of IOS CA and PKI in general is we can revoke a certificate at will. For VPN applications this is much better than pre shared keys. In the following exmample, let’s imagine that R5 is being decommissioned.
Checking the serial # on the router
using ‘show crypto pki cerfificate’ on router 5, we can see that the serial number of the certificate is 7. Let’s verify this on the CA.
Verifying the serial # on the CA
using the more command, we can view the contents of certificate serial #7 in the CA database.
Let’s go ahead and revoke the certificate
Revoking a certificate
we revoked the certificate using cry pki server <ca name> revoke <serial #>. This will cause the crl file to be updated so enrolled devices with revocation checking will stop accepting the certificate.
Wrap up
There you have it, a basic utilitarian IOS CA configuration. There are a lot of details left out such as auto-renewal, whether or not to make the private key of the CA exportable for DR purposes, etc. But this is a good 80% solution in my opinion.
Hope you found this useful and I’ll see you around.
In this post we’re going to do a brief overview of Containers and Kubernetes. My aim here is to set the stage for further exploration and to give a quick back of the napkin understanding of why they’re insanely great.
From the earliest days of computers that had multitasking operating systems applications have been hosted directly on top of the host operating system. The process of deploying, testing and updating applications was slow and cumbersome to say the least. The result: mounting technical debt that eventually consumes more and more resources just to keep legacy applications operating, without any ability to update or augment them.
Virtualized Deployment
Virtualization enabled multiple copies of a virtual computer on top of a physical computer. This dramatically improved the efficiently of resource utilization and the speed at which new workloads could be instantiated. It also made it convenient to run a single application or service per machine.
Because of the ease in which new workloads could be deployed, In this era we started to see horizontal scaling of applications as opposed to vertical scaling. This means running multiple copies of a thing and placing the copies behind a load balancer, as opposed to making the things bigger and heavier. This is an example of how introducing a new layer of abstraction results in innovation, which is a hallmark of the history of computers.
However, Some problems emerged with the explosion of virtualized distributed systems. Horizontal scaling techniques add additional layers of complexity, which made deployments slower and more error prone. Operations issues also emerged due to the need to monitor patch and secure these growing fleets of virtual machines. It was two steps forward, one step backward.
Container deployment
Containers are a similar concept to Virtual machines, however the isolation occurs at the operating system level rather than the machine level. There is a single host operating system, and each application runs in isolation.
Containers are substantially smaller and start almost instantly. This allows for containers to be stored in a central repository where they can be pulled down and executed on demand. This new abstraction resulted in the innovation of immutable infrastructure. Immutable infrastructure solves the day 2 operations of care and feeding of the running workloads. However it doesn’t solve for the complexity of deploying the horizontal scaling infrastructure. This is where Kubernetes comes in.
Kubernetes: Container orchestrator
Kubernetes is a collection of components that:
Deploys tightly coupled containers (pods) across the nodes
Scales the number of pods up and down as needed
Provides load balancing (ClusterIP, Ingress controller) to the pods
Defines who the pods can communicate with
Gives pods a way to discover each other
Monitors the health of pods and services
Automatically terminates and replaces unhealthy pods
Gracefully rolls out new versions of a pod
Gracefully rolls back failed deployments
Kubernetes takes an entire distributed application deployment and turns it into an abstraction that is defined in YAML files that can be stored in a version control repository. A single K8s cluster can scale to hundreds of thousands of Pods on thousands of nodes. This abstraction has resulted in an explosion of new design patterns that is changing how software is written and architected, and has led to the rise of Microservices. We’ll cover Microservices in another post.
I hope this was helpful and gave you a useful concept of what Kubernetes is and why it’s such a game changer. Would you like to see more diagrams? Let me know your thoughts.
I took this photo just a few minutes ago on my Monday morning beach walk. I hope you find it relaxing.
Holy cow, been 8 months since my last dispatch. Still studying and learning cool stuff, have not done a good job at stopping to document my learnings, going to make another attempt to rectify that.
Been an eventful year. In addition to learning DevOps tools and techniques and studying cloud native software design, I’ve also changed jobs. As of August I’ve been working at Cisco systems as a pre-sales Architect. It’s a dream job and I absolutely love working with my customers. I learn as much from them as they learn from me.
So yeah, the new job thing; several months of getting the firehose and struggling to take everything in and find my stride.
I didn’t feel like that was enough new stuff, so I enrolled in WGU’s Cybersecurity Bachelor’s program starting in January. I don’t **need** a degree, but I don’t think it would hurt to become a more well-rounded technologist. I’ve historically used certifications for learning paths which is fine but they tend to be narrowly defined in scope which can lead to polarized thinking.
So here’s the plan for the blog: I’m committing to posting something every Monday morning, even if it’s just a “hello, I’m drinking coffee and checking my twitter feed how about you”. I have a sizable collection of study notes, so there’s no shortage of meaningful topics however. Hopefully I’ll dip into that more than the small talk :).
Have a great week, talk to you next Monday morning.